
Lecture recordings created on Teams must be moved to the module’s Panopto folder to ensure they are accessible to all students.
All recordings on Teams will be automatically deleted after three month. If you want to retain your recordings for longer, transfer a copy of the recording to your private ‘My Folder’ or another appropriate location on Panopto.
Manual transfer to Panopto
Upload directly from OneDrive > Recordings (for recording owners)
If you recorded the meeting and you are the owner of the recording, the recording will be stored in your OneDrive > Recordings folder.
Note: if you are not the recording owner, you need to download the recording to your computer before you can upload it to Panopto
You can upload the recording directly from your OneDrive to Panopto.
- Log into Panopto and go to the folder where you want to add the Teams recording
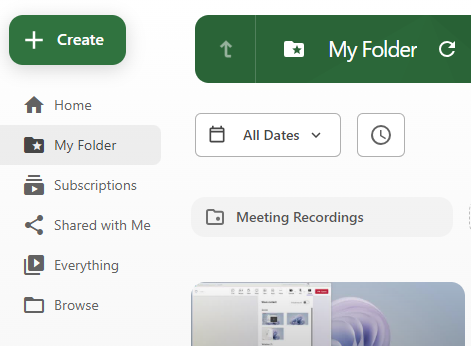
- In the Panopto Folder, click on ‘Create’
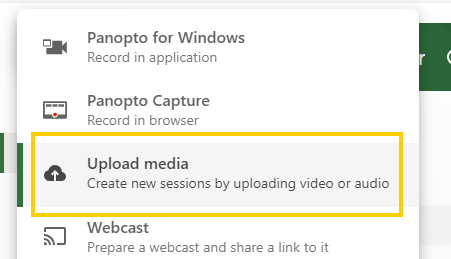
- Select ‘Upload media’ from the dropdown to open the ‘Add file’ dialogue
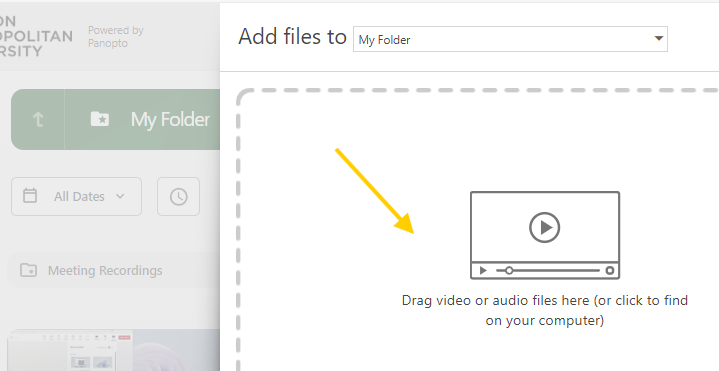
Click inside the grey box to open a File Explorer
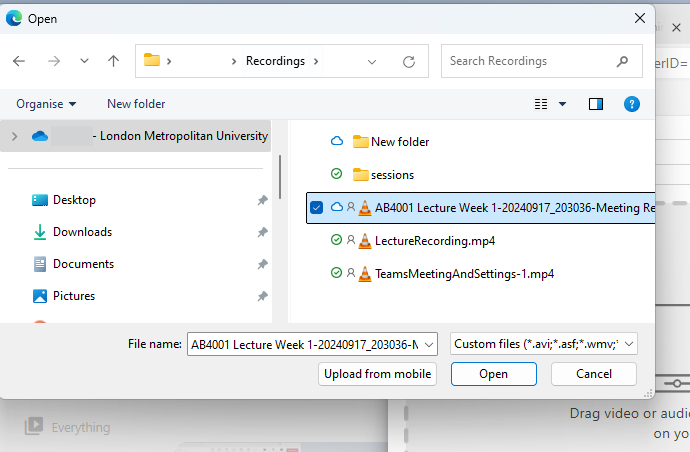
Select one or multiple recordings in OneDrive > Recordings folder and click ‘Open’ to add them to the Panopto folder
Shared and Channel recordings
Shared recordings that you don’t own and Channel recordings can’t be accessed for download through OneDrive.
You need to download the recording to your device and then upload it to Panopto.
Shared recordings in Teams Chat
If the recording has been shared with you via a Teams chat ‘Recording is ready’ message you should be able to download it from the ‘Files’ tab in the chat message.
Once a recording has been created, meeting attendees will receive a chat message in Teams. The header of the message will contain the name of the Teams meeting.
- Open Teams and click on the ‘Chat’ icon.
- Click on the ‘Recording is ready’ chat message for the recording you want to download
- Click on the ‘Files’ tab
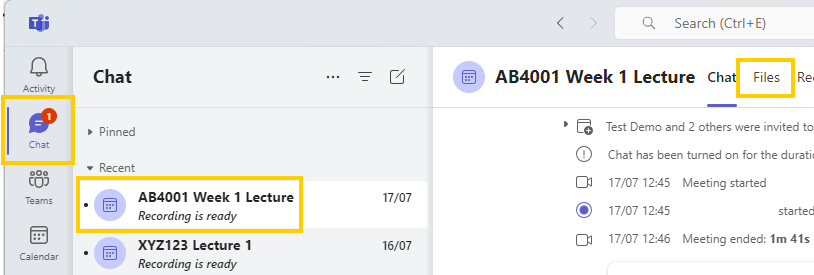
- Select the recording(s) you want to download and save them on your computer

Once the file has been saved on your device, go to Panopto and locate the folder where you want to upload the recording.
- In the Panopto folder, click on ‘Create’
- Select ‘Upload Media’
- Drop and drag the recording to the upload box or click on the box to select the recording from your device.
Channel recordings in Channel Files
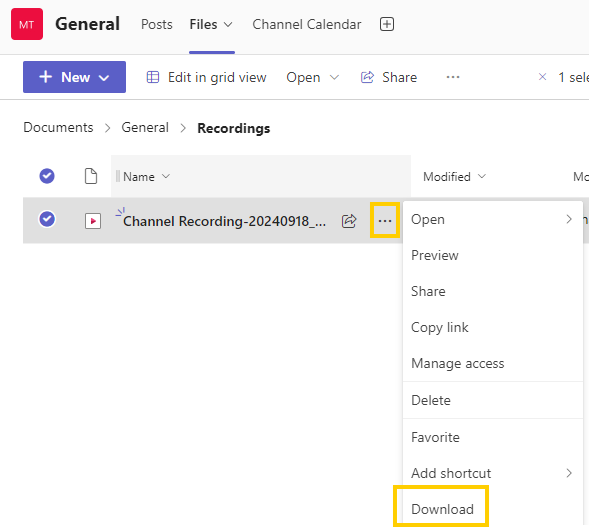
If you are member of a Team, you should be able to download recordings to your device from the Channel ‘Files’ tab.
- Go to the Team where the recording was created
- Click on ‘Files’ and open the ‘Recordings’ folder

- Click on the 3 dots next to the recording name and select ‘Download’
Once the file has been saved on your device, go to Panopto and locate the folder where you want to upload the recording.
- In the Panopto folder, click on ‘Create’
- Select ‘Upload Media’
- Drop and drag the recording to the upload box or click on the box to select the recording from your device.
Automate transfer or recordings to Panopto
The Panopto / Teams integration allows a user to automate a transfer of all recordings they own.
Once the integration has been enabled by a user, all of their future recordings will be added to the a ‘Meeting Recordings’ folder in the users private Panopto folder.
Note: this only applies to recordings you own on Teams. If someone else has recorded a Teams meeting, they need to set up their own Panopto / Teams integration to transfer their recordings automatically.
Enable Panopto / Teams integration
- Open Teams in the application or a browser
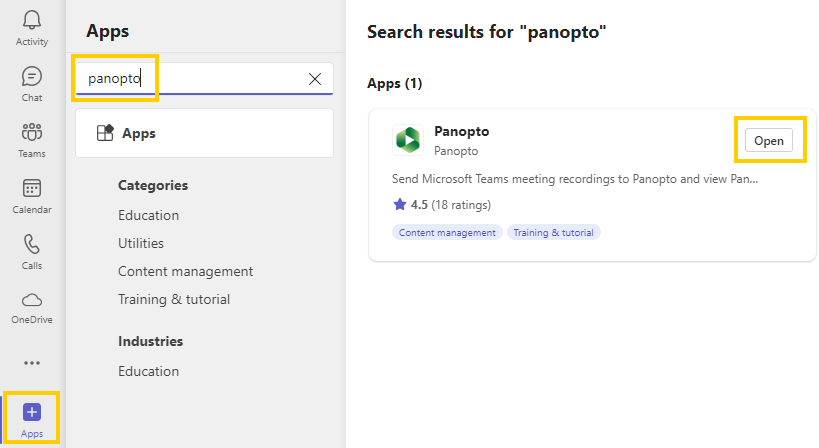
- Click on the ‘Apps’ icon and search for Panopto
- Click on the ‘Open’ button on the search result showing a Panopto tile
- Click on ‘Sign in’ and add your London Met username and password (same details as used for Weblearn)
Panopto opens on a Home page showing recordings you have access to.
- Click on the ‘Settings’ tab
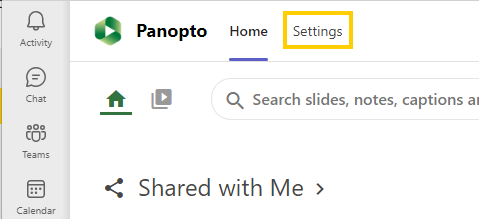
- Click on Authenticate to link your Teams account to your Panopto account and select / authenticate with your London Met IT account (username@staff.londonmet.ac.uk)

Once enabled, all recording will be moved to your personal ‘My Folder’ > ‘Meeting Recordings’ in Panopto. This will include any meeting you record after the integration has been enabled.

You can use the default settings and then move recordings to the relevant Panopto folder to share them with students. Alternatively, map recordings with a specific name to be moved to specific Panopto Module Folders.
Map Teams recordings to specific folders in Panopto
Recordings are mapped using the name of the recording, which is the same as the name of meeting. If you’re planning to use mapping, make sure that your meetings are names consistently to match you mapping criteria.
Recommendation: use the module code at the start of each meeting title when you create the meetings.
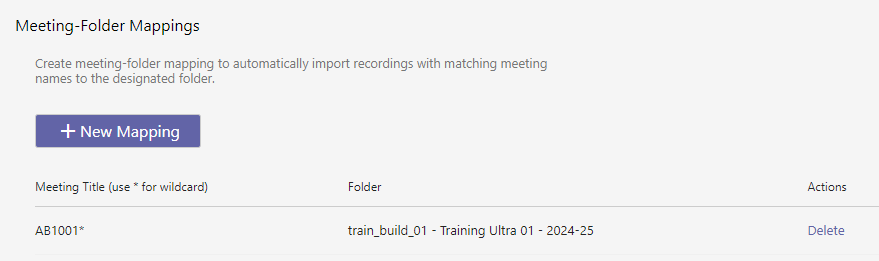
- Scroll down to the ‘Meeting-Folder Mappings’ section on the ‘Settings’ page and click on ‘+New Mapping’

- Add your Module Code or other identifier to the ‘Meeting Title’ input, followed by an * to map all meetings starting with the indentifier to a Panopto folder.
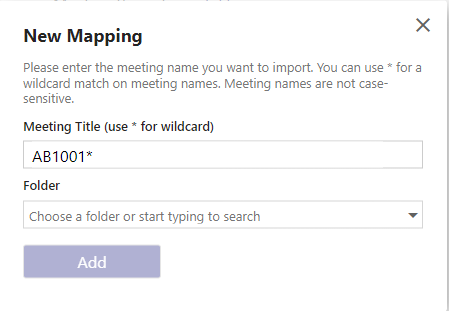
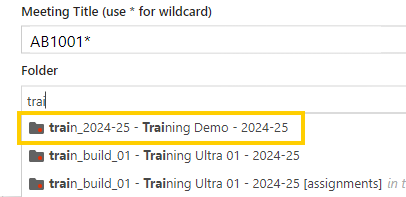
- Type your module code or other identifier in the ‘Folder’ input to view all Panopto folders with that name and select the correct folder and click ‘Add’.
The mapping is created and any recording starting with the identifier will be automatically uploaded to the specified Panopto folder until you delete the mapping.
Managing automated transfers
Once the automated transfer to Panopto has been created, all recordings a user creates afterwards will be transferred to the specified location in Panopto.
Default mapping to ‘My Folder’ > ‘Meeting recordings’
If only the default mapping is used, a user will need to move the recording from ‘My Folder’ > ‘Meeting recordings’ to a shared Panopto folder for other users to get access to the video, eg a Module Panopto folder.
Mappings to specific folders
If mappings by recording title have been set up to Module Panopto folders, the mapping must be deleted by the user at the end of the period the module is taught in and a new mapping to the Module Panopto folder for the next academic period needs to be created.
Disable imports to Panopto
Imports can be temporarily paused or the integration can be removed.
Click on ‘Pause Imports’ to temporarily stop importing recordings. Any recording created while the imports are paused will not be transferred to Panopto.
Click on ‘Remove’ under ‘Remove Integrations’ to permanently stop importing recordings to Panopto. You can re-enable the integration at a later point if needed.