
Accessibility Checker
Microsoft office applications like Word, PowerPoint and Excel have an inbuilt accessibility checker that can show you how to easily fix accessibility issues with your document.
The MS Office accessibility checker is a great tool, but it can not identify all accessibility issues. Use the MS accessibility checker together with your Ally report on Weblearn and make sure that you follow London Met accessibility guidelines regarding fonts, spacing, the use of headers and titles, alignment, etc.
Using the Accessibility Checker
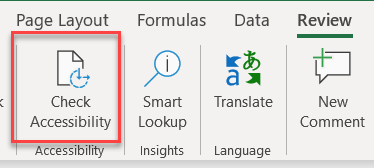
Open your document in an Office application in edit mode. On the ribbon, select the Review tab and click on Check Accessibility.
MS Ribbon > Review tab > Check Accessibility
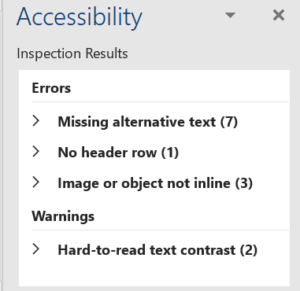
The Accessibility Checker panel opens showing a list of identified issues for the current document.
- Expand the error categories to view individual issues.
- Click on an issue and then click on the dropdown arrow to view the Recommended Actions.
- Click on an action to start fixing the issue.
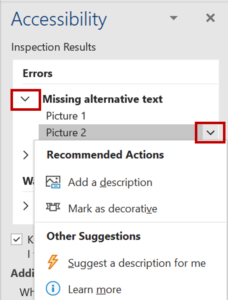
Once you work through the recommended actions, the Accessibility Checker will show no further issues.
Tick the ‘Keep accessibility checker running while I work‘ box so you can easily fix issues whilst writing or editing documents.
Issues that show as error should always be fixed before you upload the document to Weblearn. If you are not able to fix all issues listed as warning, that can be OK, but try to resolve them if possible.
Useful links: Understanding accessibility checker errors, warnings and tips, and why it is important to address identified issues.
Visit the Microsoft help page: Rules for the MS Accessibility checker
Accessible Word Documents
Word documents should be accessible to provide the best possible experience to all users. When creating a word document, you should
- follow the London Met guidance on accessible word documents
- use inbuilt styles for formatting headers, paragraphs etc
- use header levels consistently
- include alternative text for all used images and graphics
- ensure that all objects are inline with the text unless they are marked as decorative (no ‘floating’ images)
- use a sufficient contrast ratio between foreground and background colours
Microsoft video resources: Create more accessible Word documents
Create new word documents from an accessible template
Download a blank word template with logo or one of the other branded word templates and add it to your word template folder on your machine so you can easily apply an accessible template every time you create a new document.
Save file as Word Template in default folder
- Download a template and double click on the file to open it.
- Save the file as template on your computer. Word will automatically add template files to the default word template folder
File > Save As > select ‘Word Template (*.dotx)’
Create new document from downloaded template
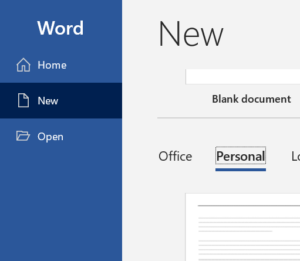
- Go to File > New and click on ‘Custom’ or ‘Personal’ depending on your version of word to find your template.
- Click on the name of your template and a new document opens.
Fix accessibility issues in existing Word document
Run the MS accessibility checker and use recommended actions to fix identified issues. Common issues that should be fixed include:
- Alternative descriptions for images
Fix: apply recommended action to add alt text or mark image as decorative - Missing Headers in tables
Fix: apply recommended action to add header row - Object not inline
Fix: apply recommended action or mark object (image) as decorative - Contrast issues affecting text
Fix: Change font colour to create sufficient contrast ratio between text and background
Microsoft accessibility guidance: Make your Word document accessible (Windows and Macs)
The MS Accessibility checker doesn’t highlight issues with incorrect formatting of headers as errors. To check that a document is using inbuilt styles to denote headers, use the Outline view in Word
- Click on the ‘View’ tab in the Microsoft Ribbon
- Select ‘Outline’ in the view panel
- Use ‘Show levels’ to check what levels exist in the document. If no level 1 headings exist, you likely need to fix the use of headings in the document by applying inbuilt styles as appropriate

Accessible PowerPoint Files
Accessible PowerPoint files are essential to provide an inclusive online learning experience to all students. Accessible PowerPoints (PPT) file should
- follow the London Met guidance on accessible PowerPoint files
- include a title for each slide
- use build-in templates with pre-defined reading order or use the Reading Order pane to confirm the reading order for each slide
- provide alternative text for images and object
- use a sufficient contrast ratio between foreground and background colours