This guide describes common steps to copy content into module that was set up from a template. To start copying content
- You must be enrolled as instructors on last year’s module and the current module.
- If you don’t have access to the 2025-26 version, use the Staff Enrol tool to request the module.
If you are not familiar with the copy process, see the Copy Content guide for step-by-step instructions.
Banner
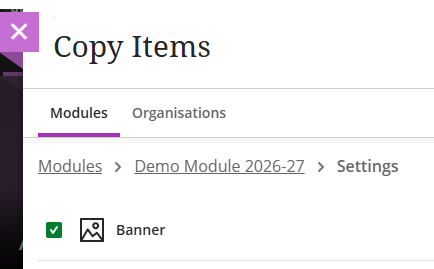
Banners are located in the Settings folder in the Copy Items dialogue. Copying a banner will add it automatically to the new module’s banner. Refresh your browser if you can’t see the banner immediately.
- Click on the plus button (+) anywhere on the Module Content page and select copy content
- Select the module you want to copy the banner from
- Click on the Settings folder and select the banner
- Click ‘Start copy’
Top section of module
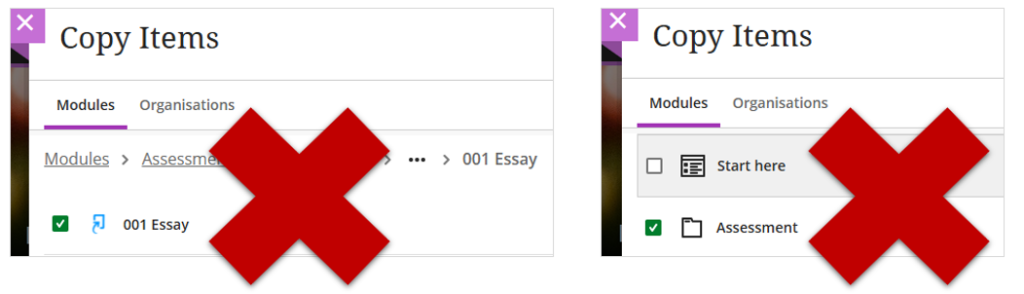
The top section of a module (Start Here, Assessment and Key Resources) must not be copied as a whole to ensure template content and links are retained.
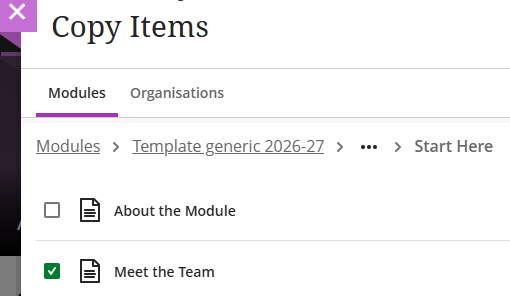
You can copy individual documents or folders from last year’s module directly into the section. The example below show how to select the ‘Meet the Team’ document in the ‘Start Here’ section.
- Open the section where you want to add content
- In the location where the content should appear, click on the plus button (+) and select ‘Copy Content’
- Select the module you want to copy from
- Go to ‘Content’ folder and click on ‘Start Here’ or ‘Assessment’
- Select the individual documents you want to copy.
- Click ‘Start Copy’
- Ensure the copied document matches the template requirements
- Delete content that has been replaced with last year’s version
Note: Do not copy Turnitin links or folders containing Turnitin links such as the ‘Assessment’ or ‘Assessment component’ folders. Resetting due dates and ensuring settings are correct will take longer than creating a new assessment.
Weekly Learning Modules
The number of Weekly Learning Modules included in the template has been adjusted to simplify the copy process.
- Only modules that have not run previously include 12-24 Weekly Learning Module in the template
- All other modules include 1 Weekly Learning Module in the template
When copying a Learning Module, all items included in the Learning Module will be copied. This includes any documents, files, LTI links (Panopto and Reading Lists) and assessment tools (Tests, Journals, etc).
- Reading list section links will be automatically relinked if the current year’s reading list contains the same weekly section as last year’s.
- Panopto video links and embeds need to be deleted and replaced with links to videos added to the current module’s Panopto Folder.
- Adaptive release settings are not copied, all content will appear as hidden.
- Settings for tests, discussions and other tool links included in the Learning module will be copied and need to be reviewed / amended.
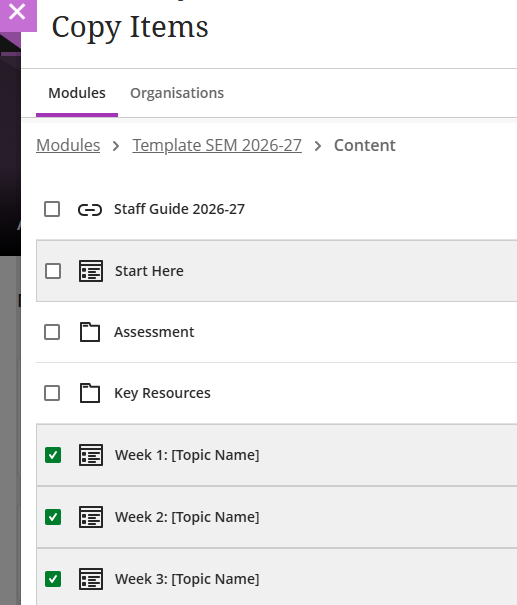
Weekly Learning Modules are located in the Content folder of the Copy Items dialogue. Select all Weekly Learning Modules that should be copied.
- Delete the example ‘Week 1’ Learning Module if not needed
- In the location where the content should appear, click on the plus button (+) and select ‘Copy Content’
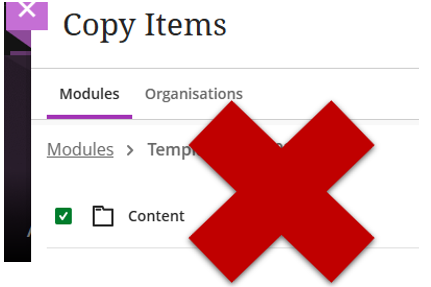
- Select the module you want to copy from and click on the Content folder (never select the entire Content folder)
- Select all Weekly Learning Modules you want to copy
- Click ‘Start Copy’
Note: Do not select the entire Content folder. It takes longer to remove duplicated and unwanted content than selecting individual weeks.
Import template Learning Modules (optional)
If your module only contains one sample Learning Module but you are not planning to copy content from last year, you can import 12 or 24 ’empty’ template Learning Modules.
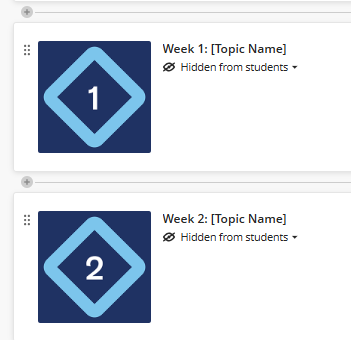
Download a ready made module package (.zip file) that contains Learning Modules with Week numbers, images and the “What’s on in Week X” document for each week at:
- 12 Weeks: Zip file for 12 Weekly Learning Modules
- 24 Weeks: Zip file for 24 Weekly Learning Modules
Once you downloaded the .zip file, go to the module content page.
- Click on the 3 dots at the top right, select ‘Import’
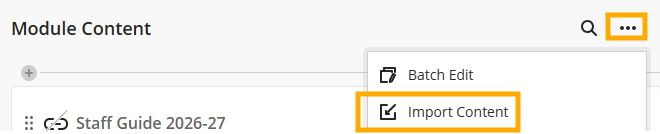
- Select ‘Import Module Content’ and upload the .zip file.
The additional Learning Modules will appear at the bottom of the content page.
Re-use Panopto videos
When re-using a Panopto video
- a copy of the video must to be added to the module’s Panopto folder of the current module
- any copied Panopto links must to be replaced with new links pointing to the copied video
- Delete all video links or embed from the current module
- Go to the Panopto folder of the previous module containing the videos you want to re-use
- Copy the video into the current module’s Panopto Folder
- Create a new Panopto video link in the current module to the copied video
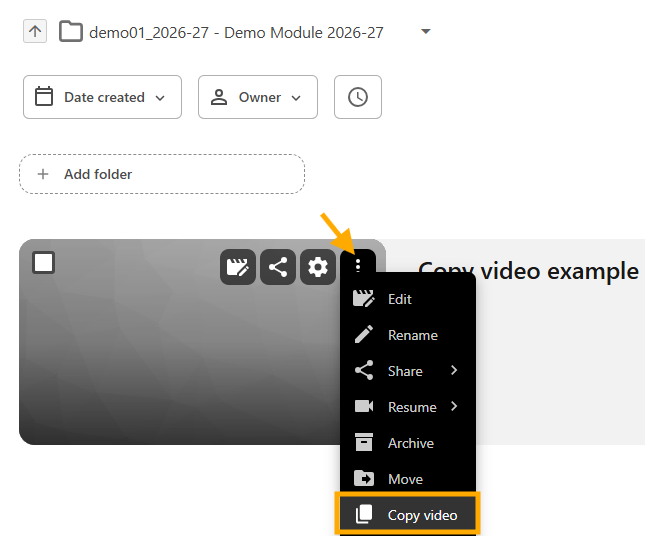
For step-by-step instructions on how to copy a video see the ‘Copy video’ guide.
See the ‘Add a Panopto video link’ guide for step-by-step instructions on how to re-add links.
The screenshot below shows where to find the copy option for a video in the module’s Panopto folder:
Why copied Panopto links need to be replaced:
When Panopto video links or embeds are copied, the copied link will point to last year’s content.
- The videos remain in the module from which the content was copied.
- Users on the current module will get viewing permissions, but lose access when last year’s videos are auto-archived or deleted.
- Videos are auto-archived after not being viewed for 12 month.
Example: A lecture recording or assessment video that has been last viewed in Oct 2025 will be archived and inaccessible to viewer from the current cohort from Nov 2026.
Tests
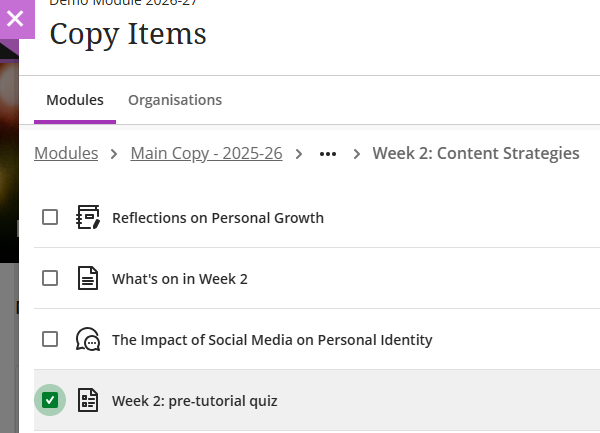
Tests are located under ‘Content’ in the ‘Copy Items’ dialogue, inside the Folder or Learning Module where they were added.
The example below shows a revision test added to a Weekly Learning Module located in a Week 2 Learning Module:
The copy of a test will include all questions, automated feedback, due dates and other settings. Test questions and settings must be reviewed after a copy to ensure they work correctly for the new cohort.
- In the location where the test should be added, click on the plus button (+) and select ‘Copy Content’
- Select the test
- Click ‘Start Copy’
- Click on the copied test and go to Test Settings
- Verify test data has been copied correctly (e.g. images included in questions, points) and adjust dates and other settings if needed
Use the Gradebook to quickly view and check multiple tests
Weblearn Rubrics
Weblearn rubrics are ‘owned’ by the module in which they were created.
Rubrics are copied into the current module
- by selecting to copy specific rubrics from the ‘Rubric’ folder in the Copy Items dialogue
- when a Weblearn tool associated with a rubric is copied (e.g. a Journal or Weblearn Assignment)
Copy selected rubric(s) only
- Click on the plus button (+) anywhere on the module content page and select copy content
- Select the module you want to copy the rubric from
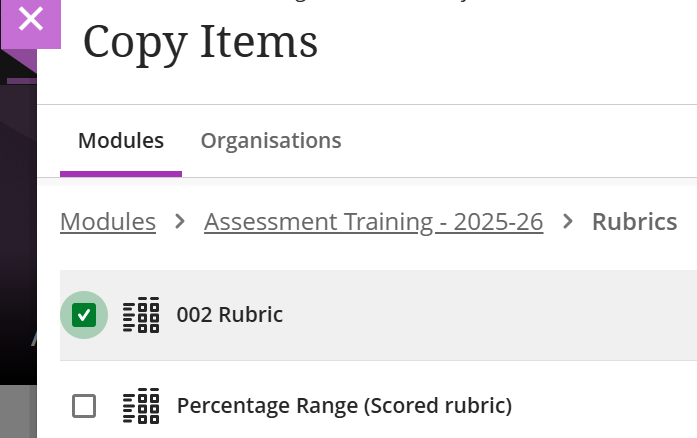
- Click on the ‘Rubrics’ folder and select the required rubric(s)
- Click ‘Start copy’
The example below shows the Rubric folder in the ‘Copy Items’ dialogue with one rubric selected to copy: