
Why are we moving to Ultra?
Ultra is the new version of Blackboard and was successfully piloted for Course Sites last year. London Met is now moving Weblearn modules to Ultra for Level 3, 4 and 7 for the 2023/24 academic year.
The ‘Ultra Course View’ provides a wealth of new features and improved workflows to create a better online experience for staff and students.
Some of the best new or improved features of Ultra include
- Progress tracking and Learner Analytics
- ‘Document’ content type for complex and rich content
- Making content interactive with ‘Conversations’
- Improved assessment tools and workflows
Working with Ultra requires a different approach to content design and module management compared to the Original Course View.
Support and training will be provided to staff to ensure a successful transition from Original to Ultra. Ultra modules for Level 3, 4 and 7 will become available on Weblearn from June.
Read the full details: Move to Ultra
What is the timeline for moving to Ultra?
From 2024-25 all modules will be set up with the Ultra Course View.
Move to Ultra timeline:
- 2021/22: Ultra Base Navigation available on Weblearn
- 2022/23: Course Sites moved to Ultra
- 2023/24: Level 3, 4 and 7 modules move to Ultra
- 2024/25: Level 5 and 6 modules and all remaining Original Organisations to move to Ultra
Find out more about Ultra: Move to Ultra
When can I start working on my Ultra modules?
All academic staff have access to a personal Ultra sandbox where you can start exploring Ultra. The sandbox module will be available to you indefinitely and can be used for developing and testing content.
All modules which have been timetabled as running will be available to staff from June onwards. There will also be an Ultra training programme and support sessions available from August 12 until September 23.
What will happen to module content?
All Ultra modules will be set up with an empty template. Content can be copied from existing Weblearn modules into the Ultra modules using the new copy feature.
The copy feature works on a granular level and allows you to select which items of content you want to copy and choose where in the new module you want to copy it to.

How long will 2023-24 modules be available on Weblearn?
2023-24 modules will remain on Weblearn and be available to staff and students until 01 November 2026.
From June 2024 staff will be able to use the module request form to request access to both 2023-24 and 2024-25 modules. This will ensure that staff are able to add themselves to modules from the previous academic year if required.
Weblearn module availability from June 2024:
| Module year | Available on Weblearn | Available for self-request | Removed from Weblearn |
|---|---|---|---|
| 2024-25 | Yes | Yes | 01 Nov 2027 |
| 2023-24 | Yes | Yes | 01 Nov 2026 |
| 2022-23 | Yes | No* | 01 Nov 2025 |
| 2021-22 | Yes | No* | 01 Nov 2024 |
*Modules not available for self-request can be requested via the University Support Portal.
What support is available for Ultra?
Training and support will be available from June until September. After this time you will be able to get help with Weblearn in the usual way via the IT Self Service Portal and our support email.
Help articles and information is also available on the Weblearn Ultra pages.
Can I arrange an Ultra session for my subject area?
Yes. As well as the advertised scheduled sessions additional training sessions and workshops can be arranged for groups of staff.
To arrange a group session contact us via the University Support Portal or our internal support email.
Overview
How do I get started with Ultra?
All academic staff have been issued with a personal Ultra Sandbox on Weblearn. The sandbox is a personal module available to you for testing and development purposes – you can try copying content from original modules, create new assignments, and share with colleagues.
Find out more: Ultra Sandbox
Ultra introduction sessions and guides for staff who want to start preparing for the move to Ultra early will be available from March. From June onwards there will be a full Ultra training programme.
Book a training session: VLE Training Eventbrite
View the help pages: Ultra Course View
Navigation menu overview
The navigation bar at the top of the module allows you to access some of the frequently used tools, such as the Gradebook, in one click.

The table below describes each tool available on the navigation bar.
| Module Tool / Feature | Description |
|---|---|
| Content | The Content tab is the main page where the module content and the Details & Actions menu can be accessed. |
| Calendar | The calendar tool will automatically add the following types of events: Due date: any assessments or tools which include a due date Schedule: if you have added the times and dates the module meets in the module schedule Instructors can add additional events to the module calendar. |
| Announcements | The announcement tool is used to send communications to all users who are enrolled on a module. See more information: Announcements |
| Discussions | The Discussion tab will appear empty to students unless you have created a discussion topic and made it available. Students cannot create discussion topics unless you enable to ‘Allow students to create discussion topics’ option |
| Gradebook | The Gradebook is the new name for what was previously the Grade Centre. |
| Messages | Module messages can be sent to individual students or groups of students. See more information: Messages |
| Analytics | The analytics tab allows you to the course report where you can view the time a student has spent in a module compared to their overall grade. |
Details & Actions menu overview
The Details & Actions menu is a fixed menu which is the same in all Ultra modules.
The student view of the menu is slightly reduced, does not include the Course Image or Question Banks links and Module Groups becomes Groups.
Staff view:

Student view:

The table below describes each tool available on the Details & Actions menu.
| Module Tool / Feature | Description |
|---|---|
| Class register | The Class register displays all users enrolled on a module, it only visible to staff, and it is where you can manage access to the module. See more information: Managing Users |
| Module Groups | The Groups page is where groups can be created and managed. See more information: Ultra Groups |
| Progress Tracking | Progress Tracking shows which items of content have been access by each student within a module. View the Blackboard information: Progress Tracking |
| Module Image | The Course Image option allows you to add a custom banner to your module. See more information: Custom Banners |
| Module Tools | The Module Tools area is where you can access all third party tools which have been integrated into Weblearn including Turnitin, Panopto and the module reading list. |
| Question Banks | Question banks are collections of reusable questions which can be used in Tests and Assignments in the module. View the Blackboard information: Question Banks |
| Add Course Schedule | The Course Schedule allows you to add the time and date the module classes are scheduled for. Note: students should be directed to their personal timetable to avoid confusion. |
Tools and Features
Where is the reading list?
The Reading list can be accessed from the Details & Actions menu under the ‘Books & Tools’ area.

The link to the Reading lists will also be included in the Ultra module template. The module template has not yet been confirmed
Where do I access Panopto?
The Panopto Folder can be accessed from the Details & Actions menu under the ‘Module Tools’ area.
The Panopto Folder will also be included in the Ultra module template. The module template has not yet been confirmed.
What is Progress Tracking?
Progress Tracking allows students to keep track of the content they have accessed within a module, and it allows the academic to see what content is being accessed by students so they can monitor the students’ progress throughout the module.
Blackboard help page: Progress Tracking
To access the tracking report, click on the more options icon and then select ‘Student Progress’

The Progress Summary for the item of content will be displayed.

You can choose to select students from the list and send them a message, or click on the students name to view the students progress for all content on the module.

Content
How do I add an image?
Images can be added to the main content panel or they can be embedded into a Document using the file upload option.
View the instructions: Managing Images
An image added to the main content panel will appear as a link. Students can access the image by clicking on the file name.
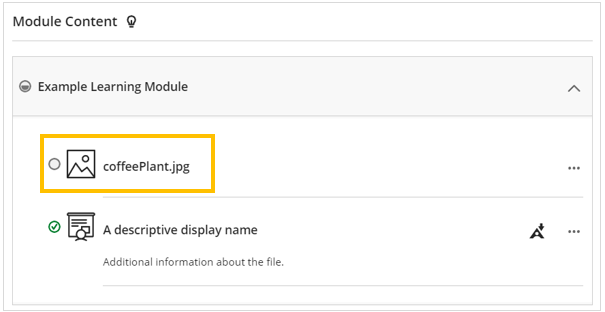
An image added to a document will display inline with the content.

How do I add a Module Banner?
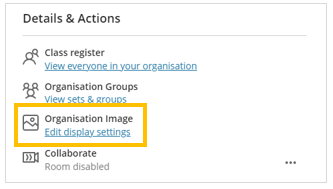
To to give your Ultra Module or Organisation its own identity you can upload a custom image. The image will appear as a thumbnail on the Modules/Organisations page and as a banner at the top of the Content page.

The image can be uploaded via the ‘Module/Organisation Image’ area under the Details & Actions menu.
View the instructions: Custom Banners
Users and Groups
How do I add users to my module?
Students will be automatically enrolled on their modules based on their module registrations on the student record system (Evision).
Additional staff and students can be added to the module using the ‘Class register’ link available under the Details & Actions menu.
View the instructions: Managing users

Can I choose which staff are displayed to students?
Staff who have been added to a module in the role on Instructor will be visible to students under the Module Staff area.

If there are staff enrolled on the module which should not be visible to students their module role can be changed to Teaching Assistant, this will hide the staff names from the list.
View the instructions: Change Users Module Role
The Module Staff list displays staff names in alphabetical order. If there is a primary contact who should be displayed at the top of the list they can be assigned as a Primary Instructor.
View the instructions: Assign as Primary Instructor
What is a Group Set?
A Group Set acts as a container where individual groups are created. The type of group and the group settings are configured on the Group set which will then be applied to all groups within the set.
For example, if you are using groups to distribute student submissions for marking you would create a group set which is hidden from student view and contains all of the marking groups.
Find out how to create groups: Ultra Groups
How do I communicate to a group?
Messages can be sent to a predefined group of students. When a message is sent from a group, the recipients list will be automatically populated with all members of the group.
View the instructions: Send a Message to a Group